
 Martin Evening is a London-based advertising photographer and noted expert in both photography and digital imaging. As a successful photographer, Martin is well known in London for his fashion and beauty work, for which he has won several awards. In 2008, he was inducted into the NAPP Photoshop Hall of Fame.
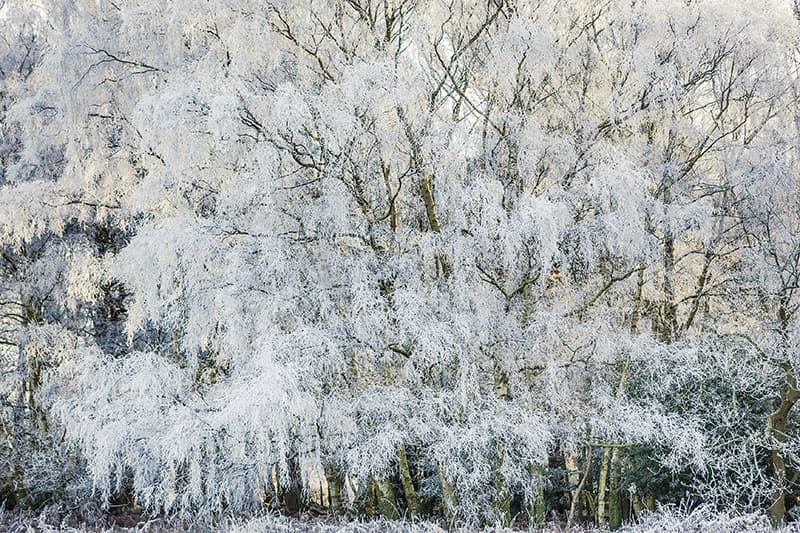
As winter has arrived I thought I would dig out an appropriately snowy scene to illustrate a white Christmas. The combined steps I applied to this image brought about some rather subtle changes. Image editing is not always about making radical transformations, and with a picture like this it was particularly important to preserve the fine highlight detail on the snow-covered branches.

In one of the steps I applied a split-tone effect to colourise the highlights and
you will notice how I set the Balance slider to -81. I did this to offset the
split-tone effect more towards the highlight end, so only the extreme
highlights received the warm-tone adjustment and the bluish colours in the rest
of the scene were preserved. In another of the steps, I applied an Effects
panel darkening post-crop vignette effect using the Color Priority style. This
usually applies a gentler post-crop vignette effect compared to selecting the
Highlight Priority mode. This is because when using Color Priority, it applies
the post-crop vignette effect after the Basic panel adjustments and minimises
any colour shifts occurring in the darkened edge areas. I also set the
Highlights slider to a maximum +100 setting. This allowed me to darken the
corners, but at the same time boost the contrast in the edge highlights.
How to Edit a Snowy Scene – Step by Step
1. The Initial Image
This shows the original scene. It came straight off the camera as a raw file and doesn’t look too bad as a
starting point.
2. Adjust White Balance

 The first thing I wanted to do was to adjust the white balance. To do this, I selected the White Balance tool in Lightroom and clicked on the white frosted branches to apply a custom white balance Temp and Tint setting.
3. Tonal Adjustments

 I then adjusted the Basic panel tone controls to lighten the image slightly, boost the overall global contrast and enhance the detail in the highlight and shadow areas.
4. Add Clarity and Vibrance

 Next, I added some extra Clarity to boost the midtone contrast and I applied a large amount of Vibrance. Generally, I don’t like to overuse the Vibrance slider on landscape images, except where the colours in the original picture are subtle.
5. Apply Tone Curve

 I then went to the Tone Curve panel and applied the tone-curve shape shown here. This lightened the midtone-to-highlight areas, while preserving detail in the extreme highlight and shadow areas.
6. Enhance Colour Gradation

 I wanted to enhance the colour gradation between the warm highlights (where the sun was backlighting the trees) and the cool blue colour in the shadow to midtone areas. Here, I applied a Split Toning adjustment that was designed to warm the highlight colours only.
7. Lens Corrections

 Next, I went to the Lens Corrections panel and clicked the Enable Profile Corrections and Remove Chromatic Aberration boxes. This corrected for lens vignetting and geometric distortion associated with the lens used, as well as any chromatic aberrations.
8. Post-crop Vignette
 Despite removing the vignetting, adding a post-crop vignette can look good, so I selected the Color Priority mode from the Style menu in the Effects panel, applied a negative Amount, but increased the Highlights setting to +100.
9. Final Adjustments and End Results

 Finally, I went to the Detail panel and applied the
settings shown here. Note that I used a narrow Radius, because this was the best setting to use when sharpening a fine-detailed landscape image such as this.


