Whether you’re new to the Fujifilm X-T2 or you’re an existing Fujifilm X-series user who has decided to upgrade to an X-T2, there’s quite a lot to take in and get your head around. With its intuitive button placement and lockable knurled dials on the top plate, the X-T2’s key controls are never far from your fingertips, but do you know all the other useful shortcuts and handy tips to get the most out of it?
If you’re already accustomed to an X-series camera the likelihood is you’ll be able to pick up the X-T2 and get great results straight away – but what about the finer settings? Do you know how to expand the exposure compensation range and inspect the level of sharpness at the point of focus with a single click? If you don’t then we recommend taking a read of our guide below that lists eleven things you might not already know about the truly excellent Fujifilm X-T2. If you’d like to read more about the X-T2, why not check out our Fujifilm X-T2 review.
https://link.brightcove.com/services/player/?bctid=5209605747001
Things you may not already know about the Fujifilm X-T2
1. How to quickly inspect sharpness at the point of focus
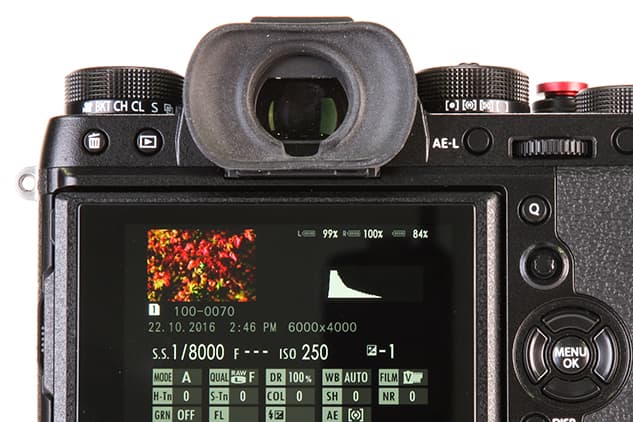
So you’ve taken a shot on the Fujifilm X-T2 and you’re almost certain you’ve nailed the focus. You might think hitting the playback button and spinning the rear command dial is the quickest way of zooming in and checking the focus quickly, but there is another way. After hitting the playback button, try depressing the rear command dial instead. This will instantly magnify the image onscreen to your point of focus. From here you can use the four-way controller or the AF point toggle to navigate other areas in the image very, very quickly.

2. How to inspect the battery percentage level
When you’re shooting with the vertical power booster you’ll notice the battery indicator levels are shown on the screen and through the viewfinder at the bottom right hand corner. If you don’t already know the quickest way to view the remaining percentage of all three batteries, try heading into playback mode before flicking the AF point toggle selector upwards. Up at the top right of the screen and viewfinder you’ll notice you’re given the percentage level of all three batteries remaining. If you don’t have the vertical power grip attached, the percentage level of just the battery inserted in the body will be revealed.
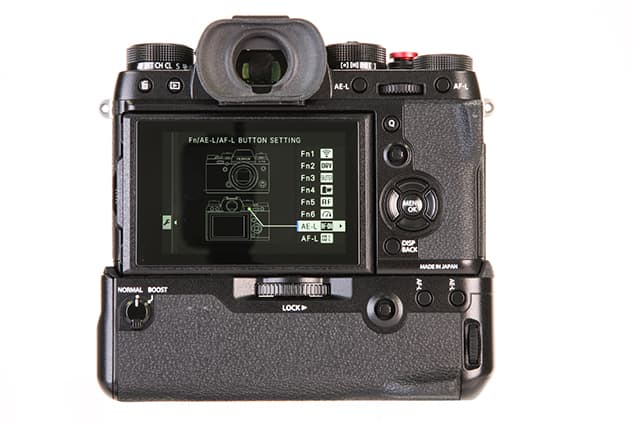
3. How to setup back-button focusing
Here at AP we regularly get asked if it’s possible to set up back-button focusing on the Fujifilm X-T2. The simple answer is yes you can and it’s something that’s very easy to do. If you’d like to control focus independently of the shutter release simply head into the X-T2’s main menu, go to the Set Up menu and select Button/Dial setting. From here you’ll want to go down to the Fn/AE-L/AF-L button setting where you’re given the option to set up the camera’s eight customisable buttons across the body. It’s recommended that AF-ON is set to either the AE-L or AF-L buttons for back button focusing. Read more about back button focusing and how to focus like a pro.
4. How to expand the range of exposure compensation
The Fujifilm X-T2 provides +/-3EV exposure compensation control directly from the exposure compensation dial on the corner of the body. If you’d prefer to set exposure compensation to values between +5EV and -5EV you’ll want to rotate the exposure compensation dial to its ‘C’ setting. You’ll instantly notice that the small exposure compensation scale on the left of the screen or inside the viewfinder now reveals +/-5EV. Rotating the front command dial will adjust the exposure compensation value.

5. How to improve the feel of the shutter button
While there’s nothing drastically wrong with the X-T2’s shutter button, those wishing to make it feel just that little bit more comfortable to shoot with will want to consider adding a soft shutter release button, which screws into the threaded shutter button. By adding a soft release you’re essentially creating a shutter button that sits fractionally higher than the original, which many photographers feel improves the handling. Just type the words ‘Fujifilm shutter button’ into Amazon and you’ll come across a long list of aluminium versions to choose from. Personally I prefer the concave type to the flat or convex types, but the choice is completely up to you. Alternatively, look at small companies such as Artisan Obscura who carve out little wooden buttons that can give a very warm, unique and rustic feel to your camera.

6. How to quickly reposition the AF point back to centre
The AF point toggle selector the Fujifilm X-T2 inherits from the Fujifilm X-Pro2 introduces a multitude of benefits. Its main purpose is to make it easier to nudge the AF point around the frame, but if you’d like to quickly reposition the AF point back to the centre of the frame you can do so easily by depressing it twice in quick succession. To change the size of the AF point, simply depress the AF point toggle selector once and use the rear command dial.

7. How to setup the forgotten-about function button
The X-T2 has no fewer than eight buttons across the body that can be assigned to different tasks. The button that’s often forgotten about is function button 2 (Fn2), which is located at the front of the body, just below the AF assist beam. Set to its default setting, this button can be used to quickly access the drive settings and change the continuous shooting speed to either 3fps, 4fps or 5fps in continuous low (CL) or 8fps, 11fps or 14fps in continuous high (CH). Note, 11fps shooting is achieved by attaching the vertical power booster grip and setting it to boost, while 14fps burst shooting is achieved the same way but also requires the shutter type to be changed from the mechanical shutter (MS) to the electronic shutter (ES). To assign the Fn2 button to a different function simply head to the main menu, head down to the setup menu, go to Button/Dial setting and from here select Fn/AE-l/AF-L button setting before going down to Fn2. You’ll find it can be set to a long list of different functions such as image size, image quality, film simulation, face detection, self-timer and shutter type.

8. How to check focus at close magnification before you shoot
If you want to pre-focus before you record a video or find precise focus using a manual lens, it’s helpful to view your subject at closer magnification to check focus before you shoot. This is very straightforward on the X-T2 – simply depress the rear command dial and then scroll it to the right to toggle between two magnified views. To return to full-screen again, just depress the rear command dial once more.

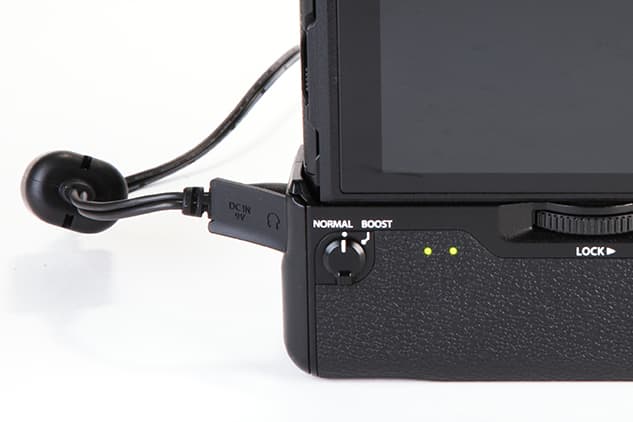
9. How to charge batteries inside the vertical power booster grip (VPB-XT2)
The vertical power booster grip (VPB-XT2) includes an AC power adapter (AC-9VS) that allows you to charge both batteries inside the grip simultaneously. What many people don’t know however is that the power adapter doesn’t charge the third battery that’s already inserted in the camera – this will need to be charged separately in the usual way. Two green LEDs will display at the rear while the two batteries inside the vertical power booster grip are being charged. When these LEDs go out it indicates they’re fully charged.
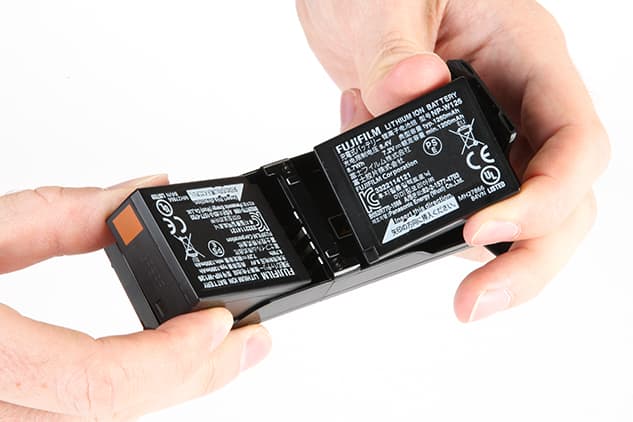
10. How to remove batteries quickly from the vertical booster grip
Try lifting the batteries out vertically like you do in the case of some DSLR battery grips and they simply won’t budge – you’re required to squeeze the batteries inwards against the metal contacts and then pull them up before reversing the process when you load a new fully charged battery. It might be basic advice, but it might just save you a few seconds fiddling around when you want to load a spare pair of batteries quickly when you’re pushed for time.
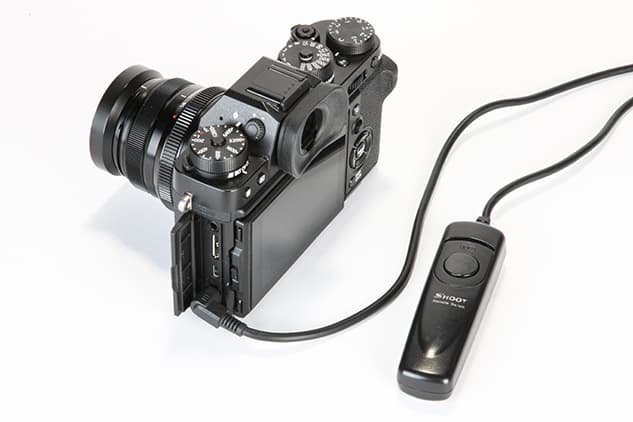
11. How to fire the shutter in different ways
There’s no shortage of different ways to trigger the X-T2’s shutter. As well as firing it the traditional way with the shutter button, you can trigger the shutter remotely via Wi-fi by downloading the free Fujifilm Camera Remote app. What’s more, if you’ve got a traditional screw-in cable release lying around gathering dust, now’s the time to dig it out and start using it again. This can simply be screwed into the shutter button and used when you want to avoid accidentally knocking or shaking the camera during an exposure. Did you also know that any Canon compatible 2.5mm jack remote will also work? Just plug this into the side of the Fujifilm X-T2 and you’ve got yourself another way of easily triggering the shutter.